Thursday, September 23, 2010
Boozing your fruit
I just found a great article on using alcohol to preserve fruit in the New York Times! They tout it as a great "entry" into food preservation, because it is hard to mess it up. Not only does it provide links to recipes, but uses for your hard work, which is sometimes the hardest part.
Wednesday, September 22, 2010
Canning Books
Food In Jars is giving away my 2 favorite canning books! Check out their site for more information.
Apples
I'm still working on a final article about food preservation. I've been spending so much time actually doing the preserving, I'm having trouble finding time to write. This is what I'm working on this week:

I picked up the peaches at the farmer's market and as of today, they are done... 9 quarts quartered in light syrup and the rest dehydrated. The green bucket has lovely red apples (Macintosh? same as the grey bucket) on top, but hiding underneath are granny smiths and some pears at the bottom. The Granny Smith apples will probably get used in a crisp this weekend. I believe the other apple variety is Gravenstein (in the white and orange buckets), which is a wonderful apple for a wide variety of uses including freezing, drying, canning, and baking. Unfortunately they don't store well, especially in my 70 degree kitchen, so I gotta get to work!
Thursday, September 16, 2010
Cashmere Aromatherapy Pillow
Today I came across a great tutorial for making your very own aromatherapy pillow. I've done something similar in the past with a knotted sock filled with rice, but this seems so much more luxurious and is right up my alley because it uses a recycled sweater! You can find the tutorial over at The Magic Onions.
Monday, September 13, 2010
Our Freezer
We picked up our side of beef this weekend, so I thought I'd share a peek of what our freezer looks like right now. We cannot possibly fit another thing into it at this point.
On top of the corn and berries I already blogged about, we've been freezing beans from our garden and I regularly make my own beef or chicken stock and cream of mushroom soup to freeze. This year, we bought 25 pounds of wild Pacific sockeye salmon, a side of pork, and a side of beef. We shared the beef and pork with my parents, keeping about 2/3 of each. In total we have more than 400 pounds of meat in here, plus fruit, vegetables, bread, soups, stocks, jams, nuts, and whatever else we can fit. I'm still waiting on tomatoes and apples for canning. After that, I think we're set for the winter.
 |
| Our Freezer 9/13/10 |
Wednesday, September 8, 2010
Food Preservation part 2 - Freezing
Freezing is exposing food to extreme cold, slowing the rate of decay and growth of organisms. Ideally, to make the most of freezing as a form of preservation, you would need to have a large freezer or “deep freeze” to accommodate your food. Not all foods freeze well, so it is important to do some research before buying a 25-pound box of whatever, making sure it is worth your time and effort.
Freezers
Freezers come in a variety of styles and sizes, and there are many important factors to consider when buying a freezer. The two biggest considerations are the volume you require for your family (if you plan to store a side of beef, for example, along with your produce, bigger is better), and how energy efficient the freezer is. Chest freezers, while many people find them less convenient, are more energy efficient that upright freezers. When you open the door of an upright freezer, all that cold air just comes out right at you, whereas with a chest, it all stays down at the bottom of the freezer. Check the number of watts or amps the freezer uses. My 20 cubic foot upright freezer is about 10 years old, and was a mid-range model... it uses only 2 amps. My parents just bought a 7 cubic foot chest freezer that uses 5! That is a huge difference in power consumption! In an emergency, we can run our freezer off our solar panels without even taxing the system. Another consideration is whether or not to buy a frost-free freezer. I am a fan of NOT going frost free and here's why. Frost-free freezers tend to be more expensive than conventional freezers and they use more power. Yes, it is inconvenient to have to defrost the freezer, but I only have to do it once a year, sometimes only every other year. Frost-free freezers also tend to dry out your foods. The cycles of frost-free units dehydrate the air, so it makes sense that they would dehydrate your food too, causing freezer burn more quickly.
Here is a photo of Cliff cleaning out our freezer last spring. It really only took a couple of hours because we put pots of hot water on the shelves, allowing the steam to help the thaw and then picking off some of the ice as it loosened up. Once the ice was all melted, we hosed it out and wiped it down, inside and out. It is important not to force it to thaw too quickly or to use a hammer, pick, or other tool to pry off the ice; this could damage the coils in the shelves of your freezer.
 There are 2 key factors to keeping food looking its best the longest and saving wear and tear on your freezer, temperature and capacity. Keep your freezer at 0 degrees F. At higher temperatures, food loses quality much faster. A full freezer is more energy efficient because it doesn't have to work as hard to maintain temperature.
Organization of your freezer is key to know what you have and how old your food is. In my upright, I have cheap IKEA bins that I labeled, so I can grab the one for the meat I need and grab the cut I want from it. All vegetables go in the basket in the bottom. Jars of soup and stock are in the door with butter, bread, etc. My next freezer will definitely be a chest. My plan for organization is to take the cheap $1 reusable grocery bags and pick a color for each food type. Vegetables go in a green bag, beef in a red one, etc. This way, I can tell at a glance where you need to look and grab that bag.
Containers
Ideal containers for freezing are uniform in size or shape, do not become brittle at low temperatures, and allow for easy sealing and marking. Personally, the only time I use containers for storing frozen foods is for delicate berries, such as raspberries, and for leftovers. I do use some canning jars for storing soups and stocks as they fit well in my freezer door, but I've found that headspace is critical when using jars. I once overfilled a jar of spaghetti sauce and when I pulled it out of the freezer, the jar broke in my hand, leaving me with 3 stitches in my thumb.
I prefer to vacuum seal my meat and produce for freezing. By removing excess oxygen, food lasts longer and is even less prone to freezer burn. According to FoodSaver.com, food last 5 times longer and you can save up to $600 a year on wasted food. I don't know my results are THIS good, but I do love my FoodSaver. Most meat and vegetables will last a year or more without noticeable (at least to me) decrease in quality if stored properly. General guidelines for expected life of frozen foods can be found here. Vegetables and even some fruits should be blanched before freezing. I will go through this in depth in a later post.
That pretty much sums up the basics of freezing as a method of food preservation. Next up, dehydrating and cellaring. Enjoy!
Freezers
Freezers come in a variety of styles and sizes, and there are many important factors to consider when buying a freezer. The two biggest considerations are the volume you require for your family (if you plan to store a side of beef, for example, along with your produce, bigger is better), and how energy efficient the freezer is. Chest freezers, while many people find them less convenient, are more energy efficient that upright freezers. When you open the door of an upright freezer, all that cold air just comes out right at you, whereas with a chest, it all stays down at the bottom of the freezer. Check the number of watts or amps the freezer uses. My 20 cubic foot upright freezer is about 10 years old, and was a mid-range model... it uses only 2 amps. My parents just bought a 7 cubic foot chest freezer that uses 5! That is a huge difference in power consumption! In an emergency, we can run our freezer off our solar panels without even taxing the system. Another consideration is whether or not to buy a frost-free freezer. I am a fan of NOT going frost free and here's why. Frost-free freezers tend to be more expensive than conventional freezers and they use more power. Yes, it is inconvenient to have to defrost the freezer, but I only have to do it once a year, sometimes only every other year. Frost-free freezers also tend to dry out your foods. The cycles of frost-free units dehydrate the air, so it makes sense that they would dehydrate your food too, causing freezer burn more quickly.
Here is a photo of Cliff cleaning out our freezer last spring. It really only took a couple of hours because we put pots of hot water on the shelves, allowing the steam to help the thaw and then picking off some of the ice as it loosened up. Once the ice was all melted, we hosed it out and wiped it down, inside and out. It is important not to force it to thaw too quickly or to use a hammer, pick, or other tool to pry off the ice; this could damage the coils in the shelves of your freezer.

Organization of your freezer is key to know what you have and how old your food is. In my upright, I have cheap IKEA bins that I labeled, so I can grab the one for the meat I need and grab the cut I want from it. All vegetables go in the basket in the bottom. Jars of soup and stock are in the door with butter, bread, etc. My next freezer will definitely be a chest. My plan for organization is to take the cheap $1 reusable grocery bags and pick a color for each food type. Vegetables go in a green bag, beef in a red one, etc. This way, I can tell at a glance where you need to look and grab that bag.
Containers
Ideal containers for freezing are uniform in size or shape, do not become brittle at low temperatures, and allow for easy sealing and marking. Personally, the only time I use containers for storing frozen foods is for delicate berries, such as raspberries, and for leftovers. I do use some canning jars for storing soups and stocks as they fit well in my freezer door, but I've found that headspace is critical when using jars. I once overfilled a jar of spaghetti sauce and when I pulled it out of the freezer, the jar broke in my hand, leaving me with 3 stitches in my thumb.
I prefer to vacuum seal my meat and produce for freezing. By removing excess oxygen, food lasts longer and is even less prone to freezer burn. According to FoodSaver.com, food last 5 times longer and you can save up to $600 a year on wasted food. I don't know my results are THIS good, but I do love my FoodSaver. Most meat and vegetables will last a year or more without noticeable (at least to me) decrease in quality if stored properly. General guidelines for expected life of frozen foods can be found here. Vegetables and even some fruits should be blanched before freezing. I will go through this in depth in a later post.
That pretty much sums up the basics of freezing as a method of food preservation. Next up, dehydrating and cellaring. Enjoy!
Sunday, September 5, 2010
Food Preservation Part 1
It is Harvest time and around here and
food is being put up almost daily. (For the uninitiated, “putting
up” food is preserving and storing it for later use). Since it is
fresh in my mind, I figured I would share some methods and tips on
food preservation.
A complete list of my favorite books for cooking and canning can be found in my book list.
There are 4 main ways to preserve food;
canning, freezing, dehydrating, and cellaring. Each method has its
pros and cons. I will briefly touch on all 4, but I do not practice
all 4 yet, so my knowledge is limited in a couple of these areas. Today, I'm just going to touch on canning. I will cover other forms of preservation in future posts.
Canning
Canning is the process of heating food
to kill microorganisms and then hermetically sealing the container to
prevent re-contamination. There are 2 types of canning: water bath
canning and pressure canning. Which method you use is determined by
one thing, the pH, or acidity, of food. In canning, all foods are
divided into 2 categories: high-acid foods and low-acid foods.
Water bath canning is used for high-acid foods; that is all recipes that have a pH of 4.6 or lower. Generally, these foods include fruits, soft spreads, and fermented foods such as pickles. Jars of food are processed in boiling water, a temperature sufficient for killing yeast, mold, and some bacteria. If dealing with food pH scares you, stick with a tested recipe and follow it exactly. This is the safest way to can in a water bath.
Pressure canning
is not something I have done yet, but a pressure canner is on my wish
list. A pressure canner is essentially a large pressure cooker
designed to hold canning jars for processing. Pressure canning is
typically reserved for low-acid foods, or recipes with a pH of 4.6 or
higher. Generally, this includes vegetables, meats, soups, and
stews. Foods are processed under pressure, allowing it to reach a
temperature of 240 degrees, thereby killing bacteria and their
spores, particularly botulism.Water bath canning is used for high-acid foods; that is all recipes that have a pH of 4.6 or lower. Generally, these foods include fruits, soft spreads, and fermented foods such as pickles. Jars of food are processed in boiling water, a temperature sufficient for killing yeast, mold, and some bacteria. If dealing with food pH scares you, stick with a tested recipe and follow it exactly. This is the safest way to can in a water bath.
There are a ton of resources out there with detailed instructions how to can. I am not going to go into detail on the process of canning in this post because I really can't give thorough and correct directions without plagarizing someone else's instructions. Honestly, I don't want to be liable if my own version of canning directions aren't complete enough and someone gets sick.
The #1 resource I suggest to
people for canning is the Ball Blue Book of preserving.
This is the canning “bible” and has detailed instructions to
get you started and a selection of tried and true recipes
as well as basic information on dehydrating and freezing. I used
this book to teach myself to can about 7 years ago. If you
purchase the Ball Canning Kit the book is included.
I also use the Ball Complete Book of Home Preserving which includes many of the
recipes from the “blue book” and hundreds more. It also
contains detailed instructions on canning and includes some
pressure canning recipes.
The third book in my library
that has great recipes is the Better Homes & Gardens New Cook Book. This is a basic cook book many people have in
their home. It was my very first cookbook when I moved out on my
own, but I forgot all about the canning recipes in it until I was
looking for a ketchup recipe and someone suggested the one in this
book.
A complete list of my favorite books for cooking and canning can be found in my book list.
Wednesday, September 1, 2010
Weekend Bounty
Last weekend, we went to visit some family about an hour north of home, at the base of Mount Baker. They grow blueberries, raspberries, corn, and irises, and raise their own beef. I love going to visit them, not only because its great to see them and catch up, but because it reminds me of my goals and re-focuses my attention on what is important to me.
They sent us home with literally a trunk load of wonderful food and I'm scrambling to get it all put up this week, before it turns. When we got home Sunday evening, we processed what seemed like 50 pounds of corn.
 Here is Cliff, cutting kernels off blanched corn, so I can pack it and freeze it. This was only about 2/3 of what we brought home.
 Here is the rest of it, 2 flats of raspberries, about the same amount in blueberries, plus some apples and pears. So far, I've made raspberry fruit leather, raspberry freezer jam, and blueberry lime jam. I'm still going to make blueberry syrup, blueberry butter, and blueberry fruit leather. The rest of the berries will be frozen for baking during the winter. For now, the apples and pears will be primarily for eating, though we'll be going back to visit in a couple of weeks and picking up our side of beef. More apples should be ready by then, and there are about 6 trees that don't get picked, so I think we're going to make use of them this year.
I'm working on posts about food preservation and freezing... as soon as I get all this work done, I can finish writing it! Happy Harvest!
They sent us home with literally a trunk load of wonderful food and I'm scrambling to get it all put up this week, before it turns. When we got home Sunday evening, we processed what seemed like 50 pounds of corn.


I'm working on posts about food preservation and freezing... as soon as I get all this work done, I can finish writing it! Happy Harvest!
Sunday, August 22, 2010
New Design
With a new purpose, I thought I new design was in order. I think the new design fits in better with the theme of homesteading. I'll probably continue to tweak over the next month or so, and your feedback is appreciated. I'm particularly concerned if the page is too wide or if the sidebars are readable with the white text.
Enjoy!
Enjoy!
Saturday, August 21, 2010
Change of Focus
I have decided to give my blog some focus. I hope that by having a more specific subject to write about, rather than whatever “strikes my fancy,” I will feel more compelled to write and become a better writer. I love talking about our DIY projects, my knitting, gardening, canning, baking, etc., and I think I have found a way to continue that, but with more purpose.
My family & I have a 5-year plan to start a path toward a self-sufficient lifestyle. To some, this is also known as modern homesteading. We have chosen to take on this lifestyle for a variety of reasons, but mostly I think it will work for us because our beliefs and the pleasure we take in doing things for ourselves. We're not "the end is coming and we better be prepared" types, though I have to say there is some comfort in knowing that if there is a major economic or natural disaster, it is likely we would be okay.
Right now, we live on a small lot in a "semi-urban" neighborhood. I say "semi-urban" because we live close to downtown, but it is a small town of about 15,000 people, on an island, in northwest Washington State. We are about 2 hours north of Seattle and a little over an hour from Canada. Part of our goal is to acquire a 3-5 acre plot in Skagit County where we can build a house and farm.
We have lived in our current house for 3 years. The house was originally built in 1949 as a vacation home/cabin. It has been added on to and remodeled over the years and has many quirks. We have yet to take on a home improvement project that was not complicated by the character of the house or the inadequacies of the previous remodel.
We live in a unique climate that some people attribute to a "banana belt" and others to the "Olympic rain shadow.” We have a mild climate with an annual average of 27 inches of rain (compared to Seattle's 36 inches), an average winter low of about 36 degrees, and an average summer high of only 71. We typically see about a week of cold in the 20s with 1-2 good bouts of snowfall and about a week of hot in the 90s. We are surrounded by a multitude of saltwater beaches (remember, we live on an island that is only about 40 square miles), rivers, lakes, and mountains. I am awestruck daily by the natural beauty that surrounds us.
We plan to use the time until we acquire our land to educate ourselves and adjust our lifestyle. I think our path to self-sufficiency will constantly change and evolve. Will we become full-time farmers? Will we be able to sustain ourselves with the fruits of our own labor, bartering or selling our goods as necessary? Will we be able to quit our "day jobs" or change to something less demanding/more flexible? Only time will tell.
Fortunately, many of our hobbies are skills that fit nicely into the homesteading lifestyle (which may be part of the reason we are so drawn to it). My significant other, Cliff, prefers to take on projects that involve power tools. He loves to build me toys (and more than a few for himself). He has a background in electronics, so he is in charge of the technical and power-related projects. I enjoy knitting, crocheting, sewing, baking, and cooking. I also hope to discuss food preservation, alternative power, and gardening.
I hope you will follow along as I share our journey... our struggles and our successes, as we learn to become a self-sufficient family.
Saturday, July 10, 2010
Designs
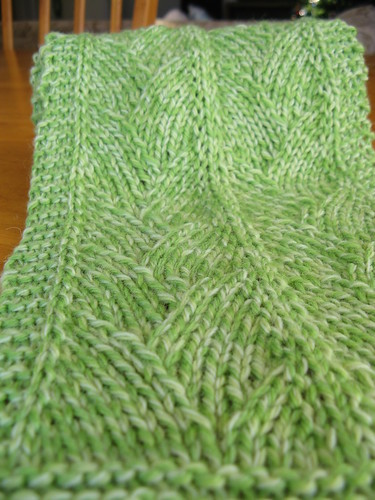
I'm "officially" a pattern designer... I just listed my first design on Ravelry, a scarf I made for my son last fall. Its the Dragon Scale Scarf on Ravelry. If you aren't on Ravelry (shocking really!) Leave a comment or drop me an email and I'll send you a copy for free.
Tuesday, July 6, 2010
Mystic Farms Sale!
Mystic Farms is having a Christmas in July sale! Now through July 15, prices are marked 20% off selected products.
I hope you'll come check it out.
Mystic Farms
I hope you'll come check it out.
Mystic Farms
Friday, May 14, 2010
Buy Handmade
I have taken the buy handmade pledge, have you?

Please consider handmade/handcrafted goods when buying for yourself, your loved ones, and for gift giving.
Please consider handmade/handcrafted goods when buying for yourself, your loved ones, and for gift giving.
Saturday, May 8, 2010
I'm on Etsy!
I've been very busy working on my new business and my new Etsy shop the last couple months. I'm very excited to announce the launch of Mystic Farms! I make all natural lotion bars, liquid soaps, and other household products.

As part of my New Year's Resolution, as you may remember, I chose to no longer buy products that contained ingredients I could not pronounce. As a result, I started experimenting making my own liquid soap and lotion bars. In my research, I quickly realized that not a lot of people make liquid soap, and I LOVED making it. Using my family as guinea pigs, I've spent the last few months refining my recipes and coming up with a product I'm thrilled to offer in my shop. I also plan to offer vegetable wash and bug repellent stick and spray, as well as a garden insecticide spray.

I've even created a facebook page for my shop. I've resisted facebook for years, even though it seems like "everyone" is there. If you become a fan, you'll be notified of any local events I participate in as well as updates to my Etsy shop.
My products are 100% natural and contain no synthetic colors, fragrance, preservatives, or petroleum products. I hope you'll take a minute to browse my shop. I'd appreciate your support.

As part of my New Year's Resolution, as you may remember, I chose to no longer buy products that contained ingredients I could not pronounce. As a result, I started experimenting making my own liquid soap and lotion bars. In my research, I quickly realized that not a lot of people make liquid soap, and I LOVED making it. Using my family as guinea pigs, I've spent the last few months refining my recipes and coming up with a product I'm thrilled to offer in my shop. I also plan to offer vegetable wash and bug repellent stick and spray, as well as a garden insecticide spray.
I've even created a facebook page for my shop. I've resisted facebook for years, even though it seems like "everyone" is there. If you become a fan, you'll be notified of any local events I participate in as well as updates to my Etsy shop.
My products are 100% natural and contain no synthetic colors, fragrance, preservatives, or petroleum products. I hope you'll take a minute to browse my shop. I'd appreciate your support.
Monday, March 22, 2010
Starting a Revolution
I just finished watching the first episode of Jamie Oliver's new show, Food Revolution. I've been following his Ministry of Food campaign for the last couple years, and watched the success he has had reforming the meals in the UK school system. This man gets it. He has such passion for what he does, and truly believes he can make a difference. I honestly hope he does. The USDA school lunch program is a sorry excuse for nutrition, and the preservatives they stuff down our kids' throats are not doing them any favors. I hope I have set an example of better food choices for my child, although it was only in the last 2 years that I've been aware of how important those choices are.
Obesity and diet-related diseases such as diabetes and heart disease are killing us. The American lifespan is actually DECREASING! Statistically, our children are going to live 10 years LESS than we will. This is appalling and something has to change. Eating fresh, local ingredients and cooking from raw (rather than processed) are SO important to maintaining a healthy lifestyle, and it really so much easier than most people realize. If you're timid about putting a fresh, from scratch meal on your dinner table 5 days a week, I encourage to check out Jamie's books or his website.
Please, sign the petition to save cooking skills and improve school food.

"I've been to South Africa, in the townships, and they're getting better food than your American kids. Now if I were you, I'd be really pissed off." - Jamie Oliver
The above statements are purely personal opinion and in no way sanctioned or endorsed by Jamie Oliver or his representatives. I am simply a fan and wholeheartedly agree with his campaigns.
Obesity and diet-related diseases such as diabetes and heart disease are killing us. The American lifespan is actually DECREASING! Statistically, our children are going to live 10 years LESS than we will. This is appalling and something has to change. Eating fresh, local ingredients and cooking from raw (rather than processed) are SO important to maintaining a healthy lifestyle, and it really so much easier than most people realize. If you're timid about putting a fresh, from scratch meal on your dinner table 5 days a week, I encourage to check out Jamie's books or his website.
Please, sign the petition to save cooking skills and improve school food.
"I've been to South Africa, in the townships, and they're getting better food than your American kids. Now if I were you, I'd be really pissed off." - Jamie Oliver
The above statements are purely personal opinion and in no way sanctioned or endorsed by Jamie Oliver or his representatives. I am simply a fan and wholeheartedly agree with his campaigns.
Sunday, March 7, 2010
Olympic Gold!
The Olympics are over and everyone has gone home. Being relatively close to Vancouver, there was a bit Olympic Fever here and I decided to compete in the Ravelympics Sock Hockey and Single Skein Speed Skate.

The Challenge: Knit a pair of socks, casting on no earlier than the opening ceremonies, and binding off no later than the end of the closing ceremonies.
The pattern I chose was Twisted Tulip Socks from Interweave Knits Spring 2008.
The yarn I chose was Pagewood Farms Yukon in Turquoise color.
Mods I made included a short 2 x 2 cuff and eliminating the cabled pattern on the foot.
I attended the Cast-On Party at Knot Just Yarn and I was off and running. By the end of the first weekend, I had this:
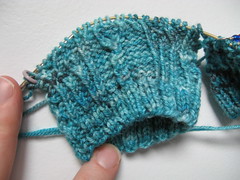
I didn't feel like this was a very encouraging start, but I wasn't going to give up! A friend & I were headed off for a fiber-filled weekend with lots of knitting time, and I knew if I could turn the heel by the half-way point, I still had a chance. By the time I headed home on Sunday, I had this:
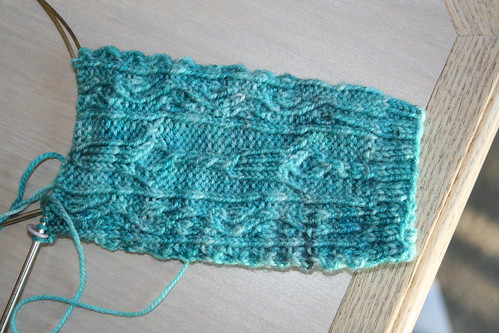
I finished the heel flap that evening, and turned the heels the following morning. I was in the home stretch!
I finished the socks with about 36 hours to spare. Not only did I finish an awesome pair of socks, I proved that it doesn't take me an entire year to knit socks!
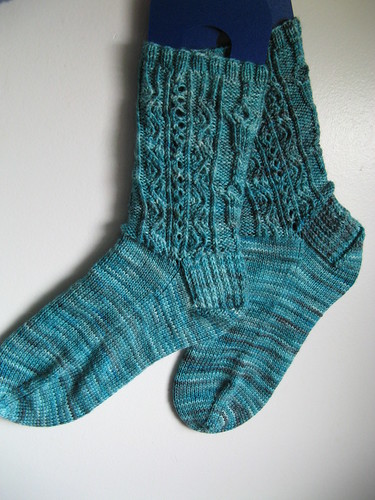


A big thank you to the volunteers at Ravelry who organized the event, and to Becky, Laura, and my Knot Just Yarn friends for the encouragement and the laughs.
The Challenge: Knit a pair of socks, casting on no earlier than the opening ceremonies, and binding off no later than the end of the closing ceremonies.
The pattern I chose was Twisted Tulip Socks from Interweave Knits Spring 2008.
The yarn I chose was Pagewood Farms Yukon in Turquoise color.
Mods I made included a short 2 x 2 cuff and eliminating the cabled pattern on the foot.
I attended the Cast-On Party at Knot Just Yarn and I was off and running. By the end of the first weekend, I had this:
I didn't feel like this was a very encouraging start, but I wasn't going to give up! A friend & I were headed off for a fiber-filled weekend with lots of knitting time, and I knew if I could turn the heel by the half-way point, I still had a chance. By the time I headed home on Sunday, I had this:
I finished the heel flap that evening, and turned the heels the following morning. I was in the home stretch!
I finished the socks with about 36 hours to spare. Not only did I finish an awesome pair of socks, I proved that it doesn't take me an entire year to knit socks!


A big thank you to the volunteers at Ravelry who organized the event, and to Becky, Laura, and my Knot Just Yarn friends for the encouragement and the laughs.
Thursday, February 25, 2010
Quote of the Day
Here's a quote that caught my attention yesterday. I've read it many times, but for some reason yesterday it struck a chord.
"I went to the woods because I wished to live deliberately, to front only the essential facts of life, and see if I could not learn what it had to teach, and not, when I cam to die, discover that I had not lived."
- Henry David Thoreau
"I went to the woods because I wished to live deliberately, to front only the essential facts of life, and see if I could not learn what it had to teach, and not, when I cam to die, discover that I had not lived."
- Henry David Thoreau
Sunday, January 17, 2010
Toys and Tools
For Christmas I received a couple of foodie-type gifts that I thought I'd share.
Cliff's sister sent us a Shiitake mushroom growing kit. We started it right after Christmas and have already harvested the first flush. We got 4-5 BIG mushrooms on the first flush and they were SO good. I sauteed them in butter and served them on steaks.
Here's what the kit looks like while the mushrooms are growing:

The white block is sawdust inoculated with the shiitake spores. The biggest mushroom on the bottom eventually got to be about 4 inches in diameter. We'll try another round next week.
This kit did seem to be rather labor intensive. While I love the idea of fresh organic mushrooms on demand, it was a little too much work for me. Eventually, if we have the space, I'd like to try inoculating a stump or log and grow mushrooms outdoors.
Cliff bought me this cast iron dutch oven that I've been coveting for a couple years now.

It is 5 quarts, which is plenty big enough for us, and a beautiful blue color. It is made by Lodge but enameled like a Le Creuset for a fraction of the price. I'm making chicken stock in it right now.
Last but not least... we've been playing with some winter gardening and we've had success with lettuce. Cliff bought a set of LED grow lights and set them up on his workbench over a couple of 5-gallon buckets. We put lettuce in one and beets in the other. We ate this lettuce yesterday in our chicken wraps:

A couple things we learned:
1. The grow lights need to be very close (12 inches or so) to the pots when the seeds are germinating.
2. Don't use chlorinated water; it retards the growth. Use filtered water or rain water.
3. Talk to your plants. This is REAL. It isn't actually talking to them that perks them up, but the carbon dioxide you exhale as you speak. Once I remembered my junior-high biology, it all made sense. Plants absorb carbon dioxide for photosynthesis... people exhale carbon dioxide... as soon as we started "breathing/talking" to our lettuce, it totally flourished! You can have tasty, homegrown lettuce in January. Who knew?
Cliff's sister sent us a Shiitake mushroom growing kit. We started it right after Christmas and have already harvested the first flush. We got 4-5 BIG mushrooms on the first flush and they were SO good. I sauteed them in butter and served them on steaks.
Here's what the kit looks like while the mushrooms are growing:
The white block is sawdust inoculated with the shiitake spores. The biggest mushroom on the bottom eventually got to be about 4 inches in diameter. We'll try another round next week.
This kit did seem to be rather labor intensive. While I love the idea of fresh organic mushrooms on demand, it was a little too much work for me. Eventually, if we have the space, I'd like to try inoculating a stump or log and grow mushrooms outdoors.
Cliff bought me this cast iron dutch oven that I've been coveting for a couple years now.
It is 5 quarts, which is plenty big enough for us, and a beautiful blue color. It is made by Lodge but enameled like a Le Creuset for a fraction of the price. I'm making chicken stock in it right now.
Last but not least... we've been playing with some winter gardening and we've had success with lettuce. Cliff bought a set of LED grow lights and set them up on his workbench over a couple of 5-gallon buckets. We put lettuce in one and beets in the other. We ate this lettuce yesterday in our chicken wraps:
A couple things we learned:
1. The grow lights need to be very close (12 inches or so) to the pots when the seeds are germinating.
2. Don't use chlorinated water; it retards the growth. Use filtered water or rain water.
3. Talk to your plants. This is REAL. It isn't actually talking to them that perks them up, but the carbon dioxide you exhale as you speak. Once I remembered my junior-high biology, it all made sense. Plants absorb carbon dioxide for photosynthesis... people exhale carbon dioxide... as soon as we started "breathing/talking" to our lettuce, it totally flourished! You can have tasty, homegrown lettuce in January. Who knew?
Subscribe to:
Posts (Atom)