
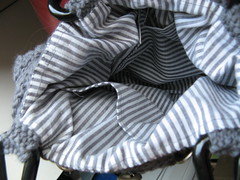
I read a couple patterns for lined bags and improvised my own based on them. The fabric is heavier cotton I had in my fabric stash. It happens to not have a wrong side, which made it so much easier. I measured the width of the bag (at the widest) and added 1 inch. Then, I measured the height of the bag and added 2 inches. I sewed the fabric together, and ironed out the side seams. (If your fabric has a right/wrong side, sew right sides together.) I then ironed and sewed a hem at the top (1/2 inch seam). I cut 2 more pieces for my pockets and ironed 1/2 inch all the way around (wrong sides together). I sewed down only 1 side of the pocket (the top). Turn the lining right side out and sew the pockets in place, with the 1/2 inch seams you ironed at the back. Be careful not to sew the two sides of your lining together. Starting at one of the side seams, pin the lining in place and work your way around. Using the overcast stitch, (great tutorial here)I sewed the lining to the top row of stitches (the bind off).
The only thing I didn't do that I wish I had (and probably will) is tack down the inside corners of the lining to keep it down inside the bag... though I suppose once it is full of stuff, that won't be much of a problem.
I hope the instructions are not as muddy as they seem to me. I am by no means a seamstress, but I am happy to answer questions if you want to give it a try yourself.
Yeah, I HAD to see the inside! It looks great, and thanks for the link to the tutorial, I have a hard time lining stuff. I can't sew a straight line to save my life.
ReplyDelete