Tuesday, July 3, 2012

The First Bump in the Road


So, I know I said this next post was going to be about our plans... but we had a bit of a hiccup.  About mid June, I received our latest water bill and our water usage had doubled!  The city came to take a look and said that we had a leak.  We had planned to have the water line looked at anyway because there had been a small amount of water under the house where the line came in for about 6 months.  I called 2 plumbers to come take a look.  The first one looked at the meter, said it wasn't running so I didn't have a leak, and left without hearing me out or anything (We won't be doing business with them again).  The second plumber showed up and I explained our water usage had doubled, but the meter wasn't turning so we don't know exactly what is going on, but we wanted a quote to have the water line replaced regardless.  About a week later, I got a quote from the second guy for $3021.63.  Crazy! 
The first quote we received!

I called to ask about ways to reduce the cost, such as digging the trench ourselves.  He said he would send a revised quote without the trench.  At this point, Cliff decided he was going to figure it out for himself and just do it.  $3000 was just a ridiculous amount of money to spend.  I decided to get a second bid on the job.  The next plumber I called gave me a rough estimate of $500 if we did our own digging.  Much better.  I figured for $500 it would be warrantied and we would be sure it was done right.  Before that plumber could even give me a final bid, Cliff already had the job done! 

The trench
I came home on Friday evening and Cliff had already dug the trench. It had rained ALL day, so he was covered head to toe in mud and he was exhausted.  Saturday afternoon was nice and sunny, until Cliff came home with a rotohammer he rented to drill through the foundation.  As soon as he got to work with that thing, the sky just opened up and rained about an inch in 30 minutes. 

On Sunday, he had to bore under the sidewalk with a piece of PVC.  He managed to run the new line, put a new shut-off valve on our side of the meter, take a crash course in soldering copper pipe, and got the whole thing hooked up and running.  In total, he spent about $100 in parts, including renting the rotohammer, and a weekend's worth of his time.  He was able to do it himself, with some advice from a helpful neighbor with plumbing experience.


This is how the incoming water line looked (on the left).
Here is Cliff's summary of the experience..."Well we have had a leaky incoming water line for a while, but the recent pressure surges from the city's water main replacement project finished it off! Our water usage doubled on the last bill.  So after getting a plumbing quote for $3000 bucks I decided I could figure it out myself.  I dug a 25' by 2 foot deep ditch.  Then I rented a RotoHammer and went through 9" of 50 year old concrete.  And today I manually bored under a 4' sidewalk.   Using your hand over the end of the pipe to create a hydraulic ram is definitively  faster than just blasting water through the pipe.  I had trouble with my plumbing soldering, but after three trips to the hardware store and lots of questions to the employees I figured out I was not using enough Flux.

  The new line is with the PVC sleeve through the concrete.
Notice the pool of water around the pipe.  Not a good sign. The new line is with the PVC sleeve through the concrete. I like how the previous repair reduced it down to 1/2 inch. No wonder we had crappy water pressure.

By the way, we received the revised bid, reduced for doing our own digging, $2073!  Still a ridiculous figure. I calculated that even if we valued Cliff's time at $50/hr, it would have only cost about $500.  Not bad, eh?

An added bonus is now we have less worry about putting in our retaining wall...I would've hated to have the wall all in and have that water line completely bust, requiring we tear down the wall.

Tuesday, June 19, 2012

Our Homestead - an update


Ok, here's the deal... I'm hoping to resurrect this blog in an attempt to share my ambitious project of re-landscaping our property.  Because we plan to incorporate mostly edible and medicinal plants, I figure this is the best place to share and document it.  Today, I'm just going to talk about how the property is now and what we have done with it so far.  Next time, I'll do an overview of what our plans are going forward.

Here is a little background on our property.  We have a 60-year-old house on a postage stamp-sized (60 x 100 foot or 0.15 acre) lot in a small town.  While we would love to have some acreage, some animals, and get away from town, it just isn't going to happen right away.  So, we've decided to make the most of what we have.  If we do find the right piece of property a few years down the road, we can write this off as a learning experience... a "practice run" if you will.
From our patio, looking west.


Here are some photos of our backyard garden from last summer.

We have one bed that is approximately 10 x 30 divided into 5 smaller beds, a long thin bed (18 inches x 22 feet), plus a number of pots and containers.  We converted this from a gravel pit about 3 years ago and each year it just gets better and better.

From my studio, looking east.
Yes, we use some Topsy Turvy planters for our tomatoes.  We have very little south-facing space and have to maximize what we have.  In our northern climate, tomatoes need all the heat they can get.

Me, breaking in our new tiller
This spring, we dug up a 15 x 27 rectangle of grass in our front yard, fenced it, and turned it into yet another garden.  The best part about this project wasn't all the food we could now produce (which is pretty awesome), but the conversations it has started.  We have gotten to know our immediate neighbors much better.  Folks we've not spoken to the entire 5 years I've lived here have stopped to tell us how great it is and how nice it looks.  I even had a woman at the library stop me and ask if I lived at the house (on our street) with the great new vegetable garden.  I never imagined the project with receive so much attention... fortunately it has been all positive.  When the city was replacing our water main a couple of months ago, even the city project manager complemented the project.
All planted, now grow dammit!


This is the new garden space.  The fence is 30" tall (city code), but it is enough to keep out dogs and we're hoping it will be too much work for any other critters in the neighborhood to deal with the fence when there is plenty of other stuff more readily available.  We bought a little tiller to help prep the space, and it is perfect for us.  It is small and only uses 6 amps, so we can run it off our solar panels.

In this bed we planted chard, beans, corn, onions, carrots, beets, kale, squash, and cucumbers, plus sunflowers, zinnias, and marigolds.  It is greening up and filling in nicely.  We can't wait to start harvesting from it!

New garden fence
Here is a street view.  The fence is set back from the sidewalk, creating a small flower bed.  I planted 5 Lavender plants, which will be wonderful to harvest once they fill in.  Between the lavender, I planted irises and lilies.  I will add more lilies this fall, the best time to transplant them.  This bed will keep the fence from being a giant swath of white wood, add some function as well as color, and give the neighbors something pretty to look at.

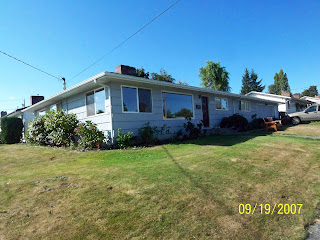
Here is the rest of our yard.  Just grass with some rhododendrons that might be 50 years old.  This photo was taken about a month after I moved in, so we had cut the rhododendrons way back, but hadn't made any other improvements at that point.  We have a corner lot, and we have moved some roses down to the east edge (to the left, out of the photo) that we hope to create a hedge with.  Really, right now its just an unexciting lot of grass that has to be mowed.


Lastly, one of my lilies currently in bloom.  So Pretty!
Lilies in bloom

Well, there it is... a summary of our property as it is now.  Next up... our plans! 

Thursday, September 23, 2010

Boozing your fruit

I just found a great article on using alcohol to preserve fruit in the New York Times!  They tout it as a great "entry" into food preservation, because it is hard to mess it up.  Not only does it provide links to recipes, but uses for your hard work, which is sometimes the hardest part.

Wednesday, September 22, 2010

Canning Books

Food In Jars is giving away my 2 favorite canning books!  Check out their site for more information.

Apples


I'm still working on a final article about food preservation.  I've been spending so much time actually doing the preserving, I'm having trouble finding time to write.  This is what I'm working on this week:

Years ago, Cliff's mom planted fruit trees on her property.  She rents out that house now, but the renters don't use the apples so we were able to pick them last weekend.  I left behind as much as I brought home, but we just didn't have any more room in the car!

I picked up the peaches at the farmer's market and as of today, they are done... 9 quarts quartered in light syrup and the rest dehydrated.  The green bucket has lovely red apples (Macintosh? same as the grey bucket) on top, but hiding underneath are granny smiths and some pears at the bottom.  The Granny Smith apples will probably get used in a crisp this weekend. I believe the other apple variety is Gravenstein (in the white and orange buckets), which is a wonderful apple for a wide variety of uses including freezing, drying, canning, and baking.  Unfortunately they don't store well, especially in my 70 degree kitchen, so I gotta get to work!

Thursday, September 16, 2010

Cashmere Aromatherapy Pillow

Today I came across a great tutorial for making your very own aromatherapy pillow.  I've done something similar in the past with a knotted sock filled with rice, but this seems so much more luxurious and is right up my alley because it uses a recycled sweater!  You can find the tutorial over at The Magic Onions.

Monday, September 13, 2010

Our Freezer

We picked up our side of beef this weekend, so I thought I'd share a peek of what our freezer looks like right now. We cannot possibly fit another thing into it at this point.

Our Freezer 9/13/10
 On top of the corn and berries I already blogged about, we've been freezing beans from our garden and I regularly make my own beef or chicken stock and cream of mushroom soup to freeze.  This year, we bought 25 pounds of wild Pacific sockeye salmon, a side of pork, and a side of beef.  We shared the beef and pork with my parents, keeping about 2/3 of each.  In total we have more than 400 pounds of meat in here, plus fruit, vegetables, bread, soups, stocks, jams, nuts, and whatever else we can fit.  I'm still waiting on tomatoes and apples for canning.  After that, I think we're set for the winter.