Tuesday, April 28, 2009

The Cabled Bag

Well, I knew someone would ask about photos of the lining for the bag. (Thanks Marissa!) I had trouble getting good photos, but here is what I came up with:

Cabled bag

Cabled Bag

I read a couple patterns for lined bags and improvised my own based on them. The fabric is heavier cotton I had in my fabric stash. It happens to not have a wrong side, which made it so much easier. I measured the width of the bag (at the widest) and added 1 inch. Then, I measured the height of the bag and added 2 inches. I sewed the fabric together, and ironed out the side seams. (If your fabric has a right/wrong side, sew right sides together.) I then ironed and sewed a hem at the top (1/2 inch seam). I cut 2 more pieces for my pockets and ironed 1/2 inch all the way around (wrong sides together). I sewed down only 1 side of the pocket (the top). Turn the lining right side out and sew the pockets in place, with the 1/2 inch seams you ironed at the back. Be careful not to sew the two sides of your lining together. Starting at one of the side seams, pin the lining in place and work your way around. Using the overcast stitch, (great tutorial here)I sewed the lining to the top row of stitches (the bind off).

The only thing I didn't do that I wish I had (and probably will) is tack down the inside corners of the lining to keep it down inside the bag... though I suppose once it is full of stuff, that won't be much of a problem.

I hope the instructions are not as muddy as they seem to me. I am by no means a seamstress, but I am happy to answer questions if you want to give it a try yourself.

Crockpot White Chicken Chili

I love my crock pot. I cook in one at least once a week. In the summer, it is particularly nice because you don't heat up the kitchen even more with the oven.

This is one of my favorite crock pot recipes. I'm horrible about taking photos while I cook, so they are a bit sparse, but here is the recipe:

Ingredients:
1 cup dry garbanzo beans
1 cup dry navy beans
1 cup dry great northern beans
4 cups cooked chicken breast - chopped
4 cups chicken broth (2 cans)
1 Tbsp olive oil
1 lg onion, chopped
1 Tbsp minced garlic (about six cloves)
2 cans diced green chilies (4 oz)
2 tsp cumin
3 tsp fresh oregano (1 tsp dried)
1/4 tsp cayenne
3 cups grated monterey jack cheese
sour cream

Rinse dry beans and pick out anything that doesn't belong. Put beans in crock pot (4 quart size is sufficient) and add enough water to cover, plus at least 2 inches. Soak for 8 hours or overnight. If you don't want to take 2 days to make your chili, you can use canned beans but I prefer starting with dry.

Drain soaked beans and add back enough water to cover plus 2 inches (again). Cook beans on low for about 6 hours or until mostly cooked through (edible but still firm).

In a 6 quart crock pot, combine beans, chicken, and broth.

In a large skillet, saute onion, garlic, chilies, and spices in olive oil until onion is nearly translucent. Add to crock pot.

Cook on low for 6 hours. One to two hours before serving, stir in Monterey Jack cheese. This can be cooked longer if needed, but at 8 hours the navy and northern beans tend to be no longer beans (mush).

Garnish with more cheese and sour cream and serve.
White Chicken Chili
Additional notes:

If using canned beans rather than dry, use 1 can of each type and be sure to drain and rinse the beans.

You can freeze the beans once they are cooked and use them as you would canned. This reduces the prep time, but still allows you to use dried beans. I freeze mine in Ziploc bags in 1 pound servings.

I've been know to use Pepper Jack cheese instead of regular Jack for even more kick.

Sunday, April 26, 2009

Forgive me...

but I'm going to brag a little. This has been a highly productive week for me and I feel like sharing. On Monday we went on a field trip to Tulip Town as part of the Skagit Valley Tulip Festival. We went early in the morning to avoid the crowds and had a great time. We even got our picture in the newspaper. I let Ethan use my point and shoot camera and he had a lot of fun taking pictures. Here is my favorite of the ones he took:
IMG_2656
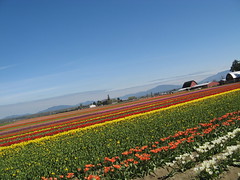
Here is my favorite that I took:
Indoor Garden at Tulip Town
You can find more of the photos we took that day on my Tulip Trip Flickr set.

Tuesday we had library day and swim lessons. I took all our garage sale leftovers to the thrift shop.

Wednesday we went to grandma's where Ethan got to see the chickens and plant his very own row of onions in the garden.

Thursday I worked my little tail off and broke my single day production record and produced 1220 lines of transcription. Before 3:00 p.m. Ethan also had swimming again.

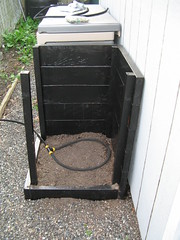
Friday I helped my mom load her wares for the local Garden Art Show into her car. While I was at her house, I helped myself to some of the anaerobic digester compost (very rich, dry, not stinky compost) she got for the garden. I turned the dirt in our garden at home and added in the good compost so we have a place for our tomatoes and peppers. I planted potatoes, onions, lettuce, spinach, mesclun, basil, parsley, and cilantro in containers. Cliff built a potato box last week, so that is what were growing our potatoes in this year. He painted it black to help retain heat and protect the wood. Here is a photo of the potato box:
Potato Box

I took more items to the thrift shop to donate and found the *perfect* bookcase I needed for our school room. Well, it wasn't perfect; it was 8 feet tall (I have 8 foot ceilings) and only 8 inches deep, but it was only $20 and everything I'd looked at so far was $80+. I couldn't even make it myself for that. The books can hang off the shelf if necessary, and I had Cliff cut the top 2 feet off for me.

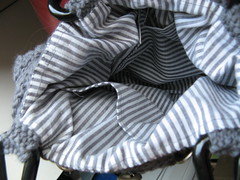
Saturday I sanded, filled, and primed the new book case, mowed the lawn, took the kids for a bike ride to the park, and started lining a knit bag that I've been avoiding for almost a year.

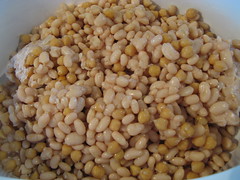
Sunday I sanded the book case again, and painted the first coat in the color Ethan chose (dark red). We took our lunch to the beach and the kids played at the playground. I ran two clothes lines and am looking for a sewing pattern for a clothespin bag. Right now I'm soaking beans to make my white chili later in the week and I still plan to mix a batch of artisan bread dough. oh! I finished lining the cabled bag! Here's a final photo:
cabled bag

All this and I still worked every day, cooked a full dinner from scratch every night, cleaned the house, and did laundry. It must be spring.

oh! Fireplace update. The new mantle is framed in, the pipe has been run in the chimney, the electricity is wired in, and the new stove is sitting in its new spot. Hopefully, the project will get wrapped up this week.
Fireplace WIP

Phew! I think I need a vacation.

Friday, April 10, 2009

A Season For Change

That's what is commonly said, right? Spring is all about renewal and change? Well, for me there is something about spring that incites BIG change. Nope, no simple spring cleaning in this house. In the past couple weeks, we've started some big projects around here.

The biggest project is the new fireplace. Here is what it looked like before:
IMG_1751Ethan is "helping" break up the cement that was under the tile hearth. You can see what the brick was like. Last week they ripped the old brick face off the fireplace and cleaned it all out. Now we're waiting for a new gas insert to to be delivered, which should happen early next week. Once the new fireplace is installed, a new low-profile oak mantle will be built around it. This is what it looks like now:
Fireplace

Along with a minor remodeling project (fortunately, I don't have to do the hardest parts of the project), I've been doing some drywall repair in the entry way. Tom, a contractor friend of the family, fixed the southeast corner of my house where the foundation has some issues. You can walk across my dining room without feeling like you'll fall through the floor now.

Speaking of dining room, I've decided to turn the dining room into our schoolroom. I bought some great maps for the walls and I'm going to build a small bookcase to house all the school books and supplies. There is a TV for the occasional educational video/documentary and lots of table space to spread out for projects.
IMG_2603
Why yes, that is my knitting on the table... I've discovered if I knit while Ethan is doing schoolwork I don't nag and hover quite as much so he's not so rushed, but I'm still available for questions and to review his work. The project in the basket is Ethan's Tunic, a great kids pattern (#232) by Knitting Pure and Simple.

I've also been purging stuff. I know I have way too much stuff. A lot of it I just ended up with when I moved here and didn't even really like, so I'm getting rid of it. Next weekend we're having a garage sale. (If you live nearby, the sale will be listed in the clamdigger but I won't be sharing my address here.) These boxes are only a small part of what I'm attempting to get rid of:
IMG_2602 I have many more boxes in the garage too. No, there is no yarn in any of these boxes. Whatever is left on Sunday goes to the thrift shop, freecycle, or dumpster... in that order. I hope having all that stuff out of here will leave me feeling a bit less burdened, literally and figuratively.

So, what kind of spring projects do you take on?

Sunday, April 5, 2009

My First Handspun

I can spin yarn! Well, sorta. I decided to give a drop spindle a whirl (pun intended) and really enjoyed my first attempt. Sure the yarn looks like sheep vomit, but it can only get better. The fiber is Corriedale wool.

My first handspun

Wednesday, April 1, 2009

Camera Lenses

I’m an amateur photographer at best, but I think I am finally growing beyond my “kit” lenses that came with my camera. I’ve been shooting with a Canon Rebel XTi for just over 2 years now. The camera came with 2 lenses, an EF-S 18-55 mm 1:3.5-5.6 II and an EF 75-300 mm 1:4-5.6 III. Until now, they’ve both served me well and I have no doubt they are great beginner lenses. I’m sure I will continue to get a lot of use out of them as there is still a lot I don’t know about photography and about the camera.

Yesterday, before the rain returned, I was outside attempting to take photos of my flowers and I couldn’t get the photos I was visualizing in my head. Part of the reason was because the blooms were all pointed downward and I was lying on the ground, on my back, having a hard time getting the angle I wanted without manipulating the flowers. The other reason was I couldn’t get the narrow depth of field I wanted. The light was heavy overcast natural outdoor lighting. I opened the aperture as wide as I could, which was only ƒ4.5 or ƒ5, and used as long of an exposure as I could keep still for, which isn’t long (1/125). Here are the photos as they were, straight out of the camera:

IMG_1690
IMG_1684

The colors are bold, but something about them looks kind of “blah.” I was aiming for a blurrier background (bokeh I think its called), and slightly brighter. Yes, I know I could manipulate them in Photoshop, but I don’t like to do this more than necessary. My thinking is if I need to alter it that much, I should have taken a better photo in the first place. Don’t get me wrong, Photoshop totally has a place, but I want to learn how to take a better photo and not rely on Photoshop too heavily to fix the problems.

I guess what I need to find out is do I invest in a higher quality multipurpose lens with a slightly wider aperture capabilities, a fixed focal length lens with wider aperture, or a true macro lens. I do like macro photography and this is definitely something I would like to do more of, but I need to do a lot more research and maybe find some knowledgeable help.